How to Set Up WireGuard VPN Client on Android Phone
0. Prerequisites
You need a working WireGuard VPN server. Learn how to set that up here: How to Set Up WireGuard VPN Server on Ubuntu
1. Install
You can get the official app from: WireGuard Google Play Store.
2. Configure
2.0. Keys
You can use your one of below host machine;
- WireGuard
server, —we set up there: How to Set Up WireGuard VPN Server on Ubuntu - WireGuard desktop
client—we set up there: How to Set Up WireGuard VPN Client on Ubuntu Desktop
Run the following command to generate the public and private keys:
$ sudo mkdir -p /etc/wireguard/clients
$ wg genkey | sudo tee /etc/wireguard/clients/android.key | wg pubkey | sudo tee /etc/wireguard/clients/android.key.pub
This places our keys under our /etc/wireguard/clients directory that we just created.
As usual, DO NOT share your private key with anyone else, otherwise your VPN will be
compromised.
You can view these files with cat:
$ cat /etc/wireguard/clients/android.key
$ cat /etc/wireguard/clients/android.key.pub
2.1. mobile.conf File
Create configuration file,
$ sudoedit /etc/wireguard/clients/mobile.conf
and add following settings:
[Interface]
PrivateKey = MOBILE_CLIENT_PRIVATE_KEY
Address = 10.220.0.2/24
DNS = 1.1.1.1, 1.0.0.1

[Peer]
PublicKey = YOUR_SERVER_PUBLIC_KEY
Endpoint = YOUR_SERVER_IP_ADDRESS:51820
AllowedIPs = 0.0.0.0/0
Replace MOBILE_CLIENT_PRIVATE_KEY with your private key in
/etc/wireguard/clients/mobile.key.
2.2. Add Mobile Client to Server
The last configuration step is to add your dekstip client’s public key and IP address to your server:
$ sudo wg set wg0 peer MOBILE_CLIENT_PUBLIC_KEY allowed-ips 10.220.0.2
2.3. Configure Your Phone Connection
There are 2 ways of doing it and as we can see the last one is the easiest and preferred one.
2.3.1. Configure From Scratch
- Open WireGuard app on your android phone
- Press the blue plus button on the bottom right
- You’ll be prompted to confirm your action, press OK.
- Select Create From Scratch
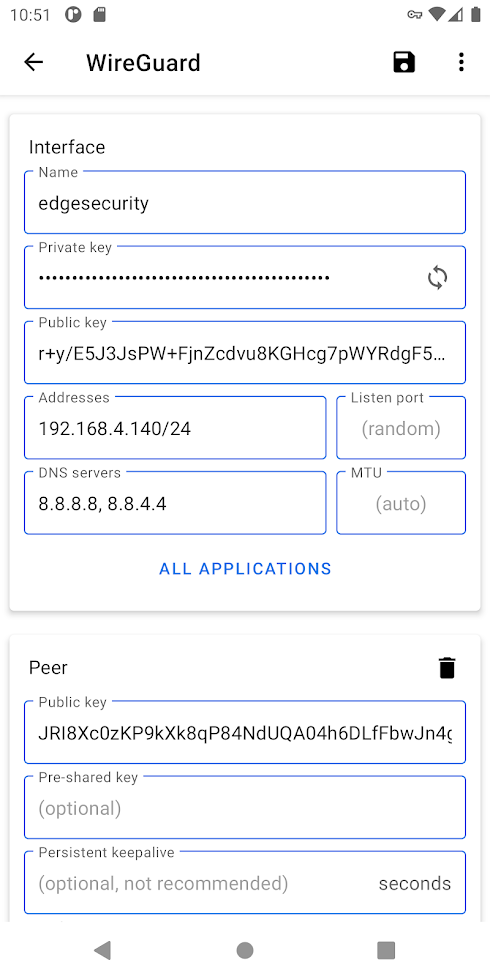
- Enter the data that we used to create
mobile.conf. You can see and example screenshot below;
2.3.2. Configure via QR Code
We are going to use qrencode package. First install it;
$ sudo apt install qrencode
Then create QR Code from mobile.conf file that we created above;
$ sudo cat /etc/wireguard/clients/mobile.conf | qrencode -o wireguard-android-conf.png
In your WireGuard Android app;
- Press the blue plus button on the bottom right
- You’ll be prompted to confirm your action, press OK.
- Select Scan From QR Code
- Scan the
wireguard-android-conf.pngfile
3. Start WireGuard
Start WireGuard connection from toggle button on the main screen of your
android app.
4. Test WireGuard
You can now check you IP searching on the browser what is my ip.
You should now see your YOUR_SERVER_IP_ADDRESS instead of your your local
IP which your ISP provided.
Congrats!
All done!
Changelog
- 2021-09-04 : Fix typo : replace PRIVATE with PUBLIC on 2.2. Add Mobile Client to Server